The easiest way I’ve found to configure the GPON SFP is to download a custom OpenWrt firmware image for Banana Pi R4 with one additional package and a custom network configuration. This firmware image will only be used to configure the fiber optic modem.
The GPON SFP SSH server uses a legacy key algorithm for authentication that is not supported by the Dropbear SSH client, so you need to include openssh-client-utils in the image. It also uses the static ip address 192.168.1.10, so we need to change OpenWrt’s default LAN gateway IP address.
You need an active fiber optic signal for the SFP internal interface to initialize so you can access and configure the GPON SFP. Otherwise you won’t be able to SSH into the GPON SFP to change its serial number for authentication with your ISP.
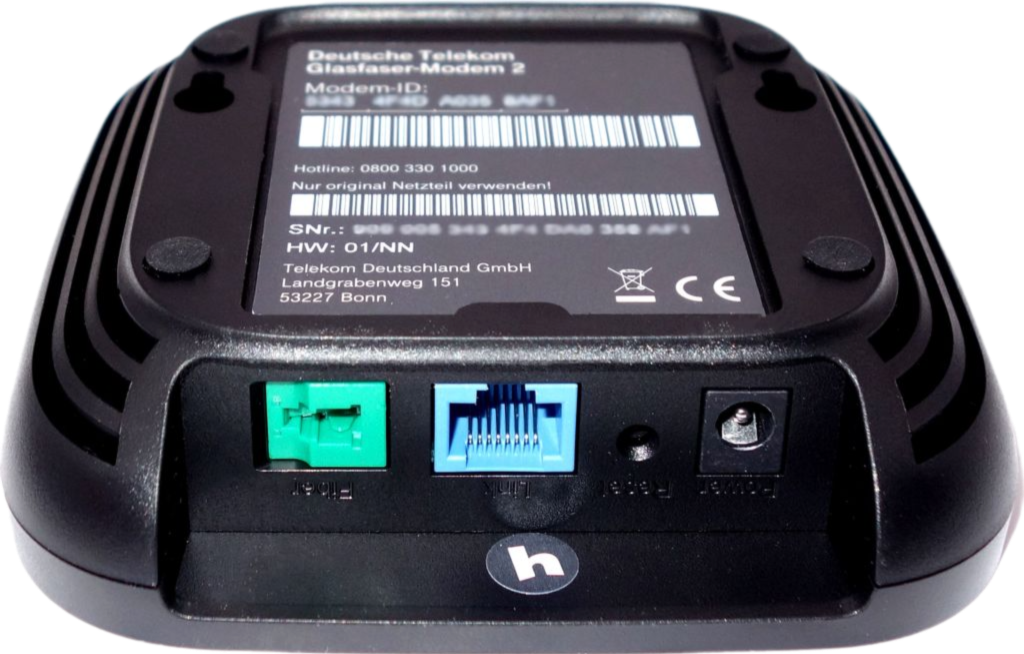
Deutsche Telekom Modem-ID
If you have an existing Telekom Glasfaser Modem 2, the Modem-ID is in the back of the device and it’s usually a 16 digit hexadecimal ID. If you’re setting up your internet connection from scratch and you don’t yet have a Modem-ID then you need to call Deutsche Telekom customer support and provide them with your own generated Modem-ID that you’ll use on the GPON SFP.
The GPON SFP expects a serial number with a 12 character string format in HEX and ASCII (the first 4 characters in ASCII and the remaining 8 characters in HEX). Here’s a list of well known GPON module identifiers and their ASCII and HEX representations.
Imagine your Modem-ID is 53434F4D0A152C6F8. Convert the first 8 HEX digits to ASCII to get SCOM , so the serial number for your GPON SFP should be SCOM0A152C6F8. Take note of it.
Flash a custom OpenWrt snapshot image
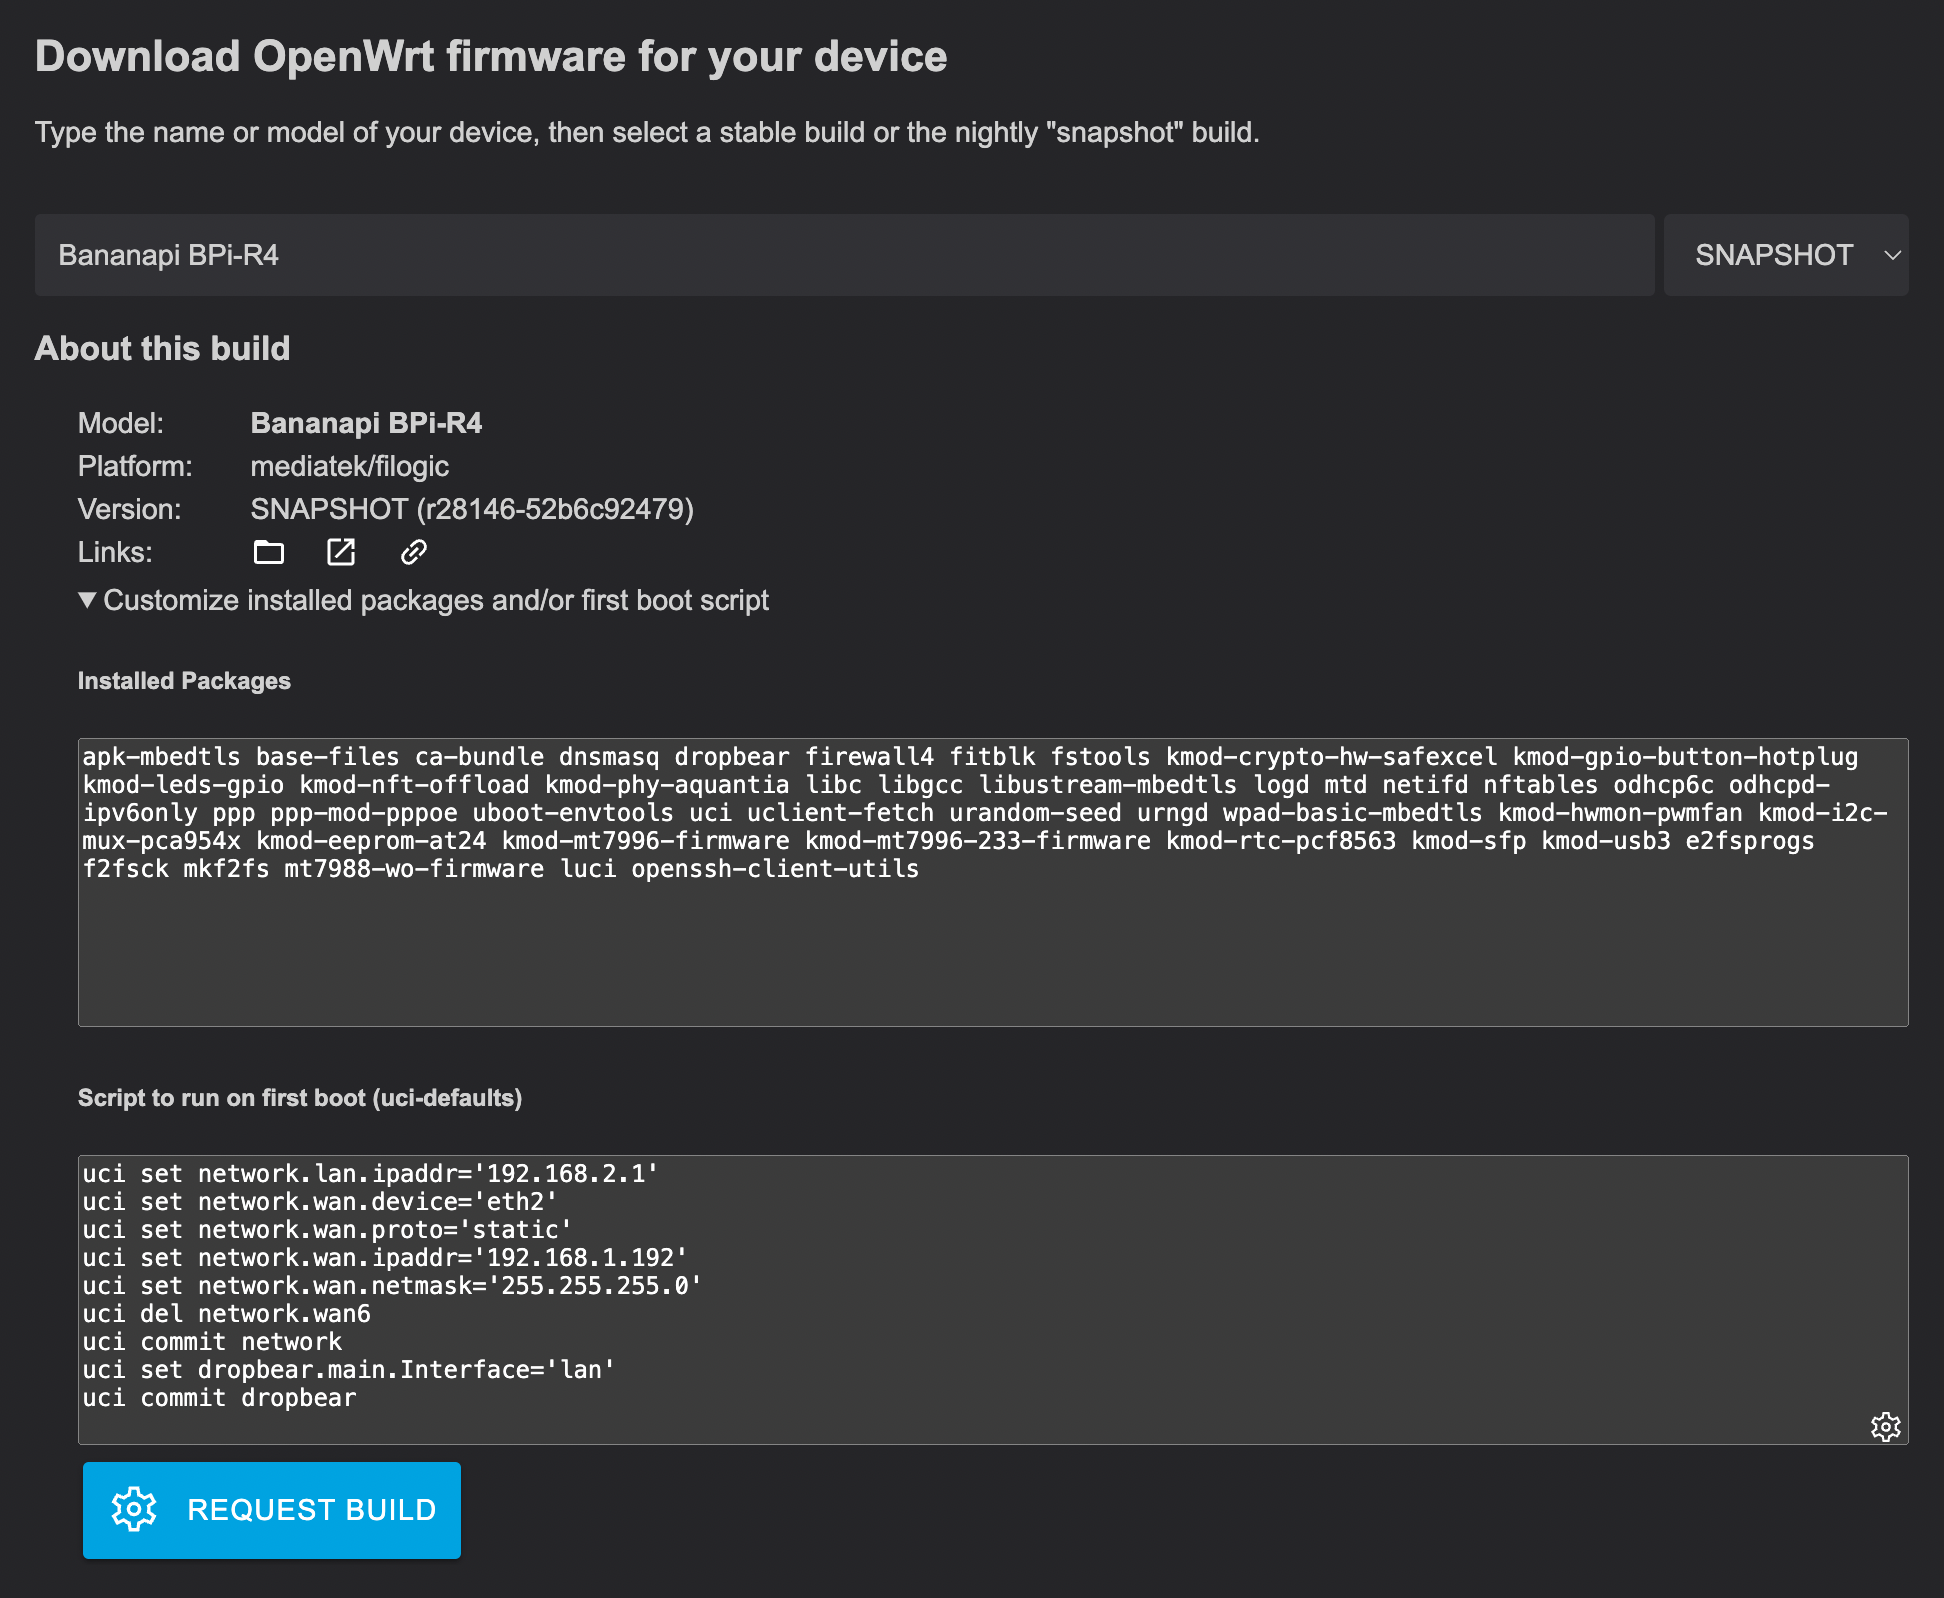
Open https://firmware-selector.openwrt.org/ and pick SNAPSHOT on the dropdown on the right and then write Bananapi BPi-R4 on the left input. Expand Customize installed packages and/or first boot script and:
add openssh-client-utils to Installed Packages
add the following commands to Script to run on first boot (uci-defaults)
Bash
Copy
# the gpon sfp uses the static ip address 192.168.1.10, so we need to change
# the router's lan ip address to 192.168.2.1 to avoid networking conflicts.
uci set network.lan.ipaddr='192.168.2.1'
# set the wan interface to a static ip address in the 192.168.1.0/32 network
uci set network.wan.device='eth2'
uci set network.wan.proto='static'
uci set network.wan.ipaddr='192.168.1.192'
uci set network.wan.netmask='255.255.255.0'
# delete wan6 to avoid network resolution conflicts
uci del network.wan6
uci commit network
# only allow ssh from lan
uci set dropbear.main.Interface='lan'
uci commit dropbear
Click Request Build and when the build finishes you can scroll down and download the SDCARD.IMG.GZ image. Flash the SD card with the downloaded OpenWrt image.
user@local:~#
Bash
Copy
gunzip openwrt-d7cc5fa501fa-mediatek-filogic-bananapi_bpi-r4-sdcard.img.gz
# get the device path using diskutil (e.g. /dev/disk4)
diskutil list
diskutil unmountDisk /dev/disk4
# flash the sd card with the openwrt image
sudo dd bs=1M if=openwrt-d7cc5fa501fa-mediatek-filogic-bananapi_bpi-r4-sdcard.img of=/dev/disk4
83+1 records in
83+1 records out
87031812 bytes transferred in 11.704005 secs (7436071 bytes/sec)
Start the router
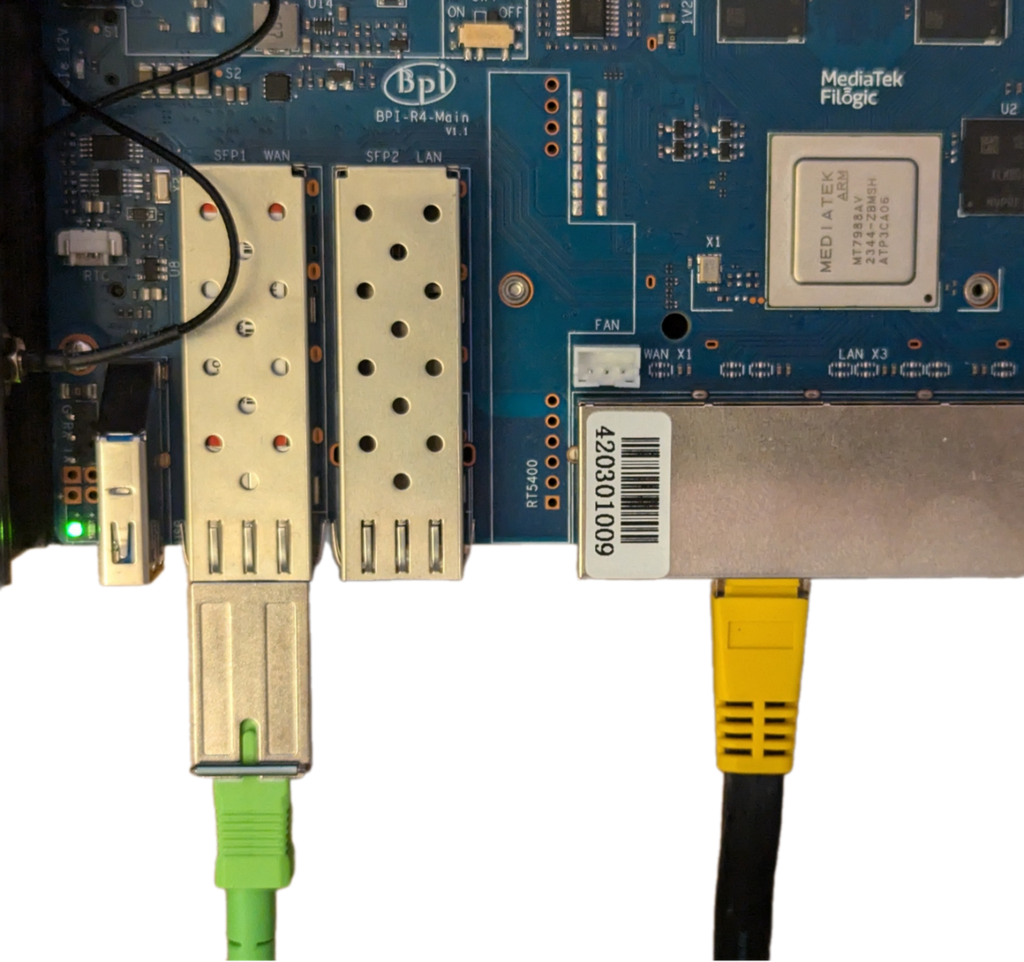
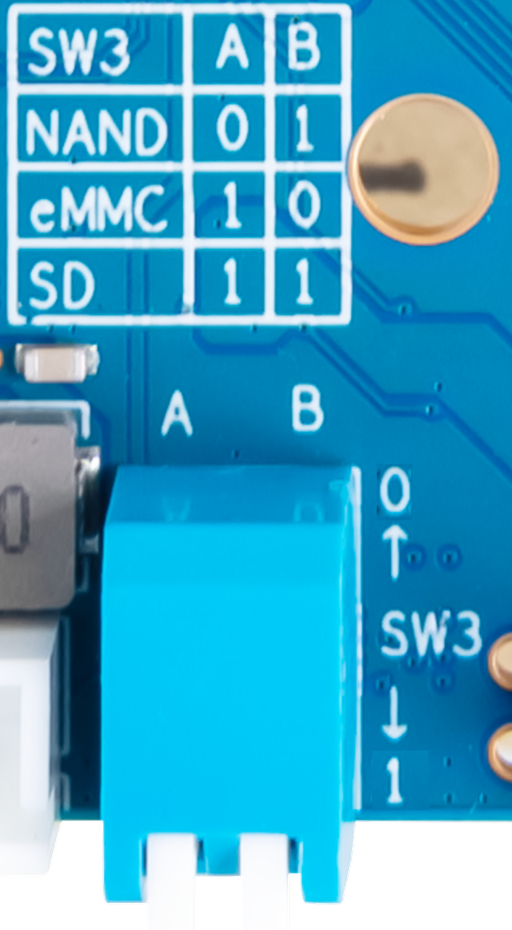
Insert the GPON SFP stick into the Banana Pi R4 SFP1 WAN slot (eth2) and the SD card. Connect the LC/APC to SC/APC cable to your FTTH termination box and to the GPON SFP. The GPON stick requires an active fiber optic link in order to bring up the SSH network interface. Make sure the boot jumper is set to SD card. Connect your computer to one of the LAN ethernet ports and then turn on the router.
SSH access to the GPON SFP
You should get a DHCP lease from the router after boot. Connect to the router using SSH.
Bash
Copy
# set a root password for basic security. you'll be using your ISP credentials
# to test your internet connection.
passwd
Changing password for root
New password:
Bad password: too short
Retype password:
passwd: password for root changed by root
# test the SSH connection to the GPON stick, and you should get an error
ssh 192.168.1.10
Unable to negotiate with 192.168.1.10 port 22: no matching key exchange method found. Their offer: diffie-hellman-group14-sha1,diffie-hellman-group1-sha1,[email protected]
# SSH into the GPON stick using a supported key algorithm
ssh -oKexAlgorithms=+diffie-hellman-group1-sha1 -oHostKeyAlgorithms=+ssh-rsa -oStrictHostKeyChecking=no [email protected]
# the password is 7sp!lwUBz1 (available in the configuration guide)
Bash
Copy
BusyBox v1.22.1 (2021-09-18 10:30:59 CST) built-in shell (ash)
Enter 'help' for a list of built-in commands.
OpenWrt - (14.07_ltq) --- Lantiq Edition for GPON
----------------------------------------------
# print the current serial number
sfp_i2c -g
nSerial=G2430061241
# get the current LAN mode
onu lanpsg 0
errorcode=0 pport=0 mode=15 enable=1 link_status=5 phy_duplex=1
The link_status property specifies the current speed according the following table.
To change the default lan mode value you can use fw_setenv sgmii_mode. The firmware has a default value of 5 and there shouldn’t be any need to change it.
Serial number
Now you can set the serial number that you’ve cloned from your Telekom Modem 2 or the serial number that you’ve generated and provided to Deutsche Telekom.
Bash
Copy
set_serial_number SCOM0A152C6F8
exit
Authentication
From the password protected PDF file Zugangsdaten ID_ XXXX.pdf sent to you by Deutsche Telekom, you will need the following:
access number (Zugangsnummer)
connection ID (Anschlusskennung)
your personal password (Persönliches Kennwort)
co-user number (Mitbenutzernummer)
The username for authenticating the modem has the following format:
{Anschlusskennung}{Zugangsnummer}{Mitbenutzernummer}@t-online.de
e.g. [email protected]
The password is the Persönliches Kennwort, e.g. 51428761. Take note of them and let’s test your internet connection.
Test your Internet connection
Revert some of the network configuration as you don’t need access to the GPON SFP anymore.
Bash
Copy
# create modem VLAN device with id 7 using eth2 (required for Deustche Telekom)
uci set network.modem=device
uci set network.modem.type='8021q'
uci set network.modem.ifname='eth2'
uci set network.modem.vid='7'
uci set network.modem.name='modem'
# configure wan interface to dial the modem device with your credentials
uci del network.wan.ipaddr
uci del network.wan.netmask
uci set network.wan.device='modem'
uci set network.wan.proto='pppoe'
uci set network.wan.username='[email protected]'
uci set network.wan.password='51428761'
uci set network.wan.ipv6='1'
uci set network.wan.keepalive='30 15'
# add wan6 (Deutsche Telekom provides both IPv4 and IPv6 public ip addresses)
uci set network.wan6=interface
uci set network.wan6.device='pppoe-wan'
uci set network.wan6.proto='dhcpv6'
uci commit network
# restart wan and start wan6
ifdown wan
ifup wan wan6
# after 5-10 seconds, and if everything is correctly configured, you should
# see IPv4 and IPv6 addresses on the pppoe-wan interface
ifconfig pppoe-wan
pppoe-wan Link encap:Point-to-Point Protocol
inet addr:93.142.221.121 P-t-P:63.121.141.218 Mask:255.255.255.255
inet6 addr: 2003:fc:d7ff:1797:4146:63ba:1eca:5e51/64 Scope:Global
inet6 addr: fe80::4146:63ba:1eca:5e51/128 Scope:Link
UP POINTOPOINT RUNNING NOARP MULTICAST MTU:1492 Metric:1
RX packets:725 errors:0 dropped:0 overruns:0 frame:0
TX packets:1046 errors:0 dropped:0 overruns:0 carrier:0
collisions:0 txqueuelen:3
RX bytes:242624 (236.9 KiB) TX bytes:672766 (656.9 KiB)
# the router should now have access to the internet
ping 8.8.8.8
PING 8.8.8.8 (8.8.8.8): 56 data bytes
64 bytes from 8.8.8.8: seq=0 ttl=61 time=8.025 ms
64 bytes from 8.8.8.8: seq=1 ttl=61 time=7.930 ms
64 bytes from 8.8.8.8: seq=2 ttl=61 time=7.838 ms
# and you can test your internet speed
apk update
apk add netperf
wget https://raw.githubusercontent.com/openwrt/packages/refs/heads/master/net/speedtest-netperf/files/speedtest-netperf.sh
sh speedtest-netperf.sh -H netperf-eu.bufferbloat.net -t 60 -p 8.8.8.8 --sequential
2024-11-24 18:53:19 Begin test with 60-second transfer sessions.
Measure speed to netperf-eu.bufferbloat.net (IPv4) while pinging 8.8.8.8.
Download and upload sessions are sequential, each with 5 simultaneous streams.
.............................................................
Download: 1066.70 Mbps
Latency: [in msec, 61 pings, 0.00% packet loss]
Min: 7.623
10pct: 8.239
Median: 9.977
Avg: 9.813
90pct: 10.775
Max: 11.440
CPU Load: [in % busy (avg +/- std dev) @ avg frequency, 58 samples]
cpu0: 29.6 +/- 2.0 @ 1500 MHz
cpu1: 18.5 +/- 2.2 @ 1500 MHz
cpu2: 18.8 +/- 2.4 @ 1500 MHz
cpu3: 19.3 +/- 2.1 @ 1500 MHz
Overhead: [in % used of total CPU available]
netperf: 2.7
.............................................................
Upload: 511.33 Mbps
Latency: [in msec, 60 pings, 0.00% packet loss]
Min: 7.315
10pct: 7.692
Median: 8.194
Avg: 8.345
90pct: 9.261
Max: 9.984
CPU Load: [in % busy (avg +/- std dev) @ avg frequency, 58 samples]
cpu0: 12.1 +/- 3.3 @ 1500 MHz
cpu1: 10.4 +/- 2.1 @ 1500 MHz
cpu2: 8.4 +/- 3.6 @ 1500 MHz
cpu3: 7.9 +/- 2.5 @ 1500 MHz
Overhead: [in % used of total CPU available]
netperf: 0.8
Now that you’re sure your GPON SFP can authenticate with the ISP and get a public IP address, you can move on to  2. WiFi 6 Support.
 2. WiFi 6 Support.


